Cool musical passage for guitar that can be used as an into, filler, or creative starting point
Some of the most effective guitar passages combine a few simple ideas: open strings, notes higher on the neck, and a fingering pattern that lets the sound flow from one note into the next.
In this lesson, we’ll explore a passage in D that uses those elements to create a cascading effect. It’s an idea you can develop into an introduction, use between phrases when the harmony allows, or expand into something of your own.
We’ll work through it in two parts: first the notes and left hand, then the right hand pattern that brings everything together.
Before You Begin: Tune to Drop D
Lower your sixth string from E to D, leaving the other five strings in their usual tuning. From the sixth string to the first, your open strings should be:
D, A, D, G, B, E
Check your tuning before you begin. The open strings are an important part of this passage, so you want them to sound clear and in tune with the fretted notes.
If you’re following the music notation or tablature, work through one small section at a time.
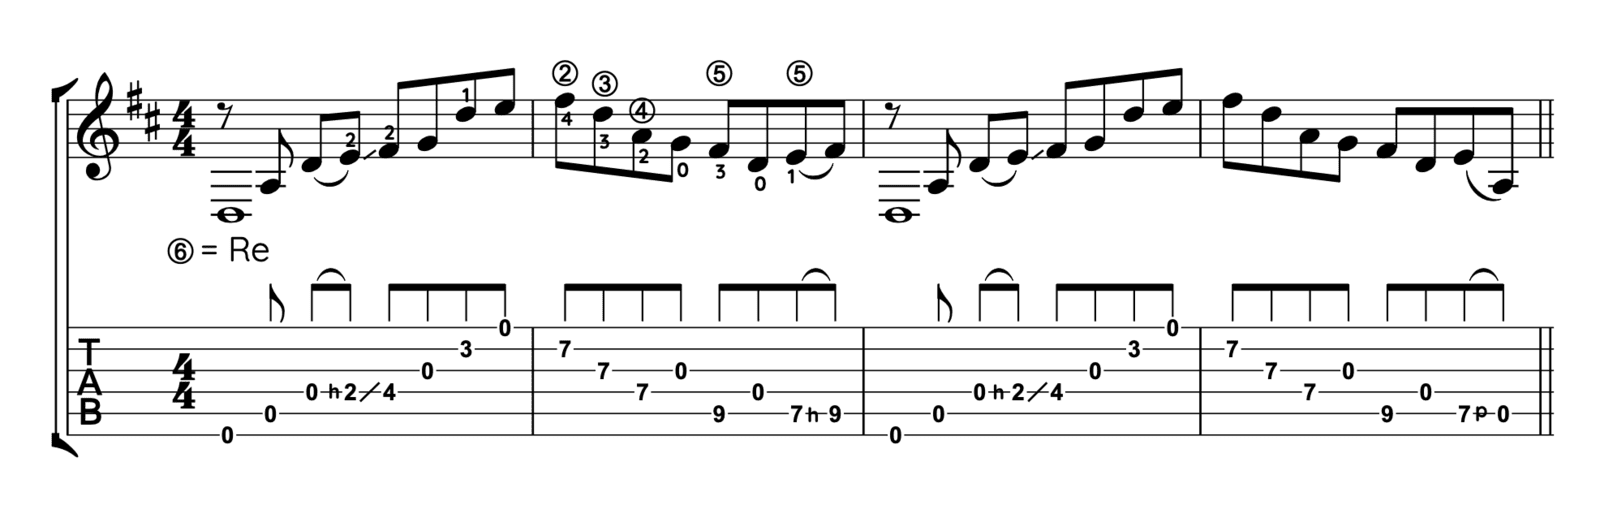
Part 1: The Notes and Left Hand
Start with the Open Bass Strings
Begin by playing the sixth, fifth, and fourth strings open, one at a time. These notes are D, A, D.
After playing the open fourth string, use your second finger, your middle finger, to hammer on to E at the second fret. Keep that finger on the string and slide up to F sharp at the fourth fret.
The opening sequence is:
D, A, D, E, F sharp
The E comes from the hammer on, and the F sharp comes from the slide. You don’t need to pluck the string again for either of those two notes.
Practice this opening slowly until the open D, the E, and the F sharp connect smoothly.
Continue Across the Upper Strings
Next, play the open third string, G. Follow it with D at the third fret of the second string, then the open first string, E.
This completes the opening ascent:
D, A, D, E, F sharp, G, D, E
Let the open strings continue ringing where the fingering allows. That overlap helps give the passage its flowing character.
Move to the Seventh Fret
The next three notes are F sharp, D, and A, all played at the seventh fret on different strings.
Here is the left hand fingering I use:
| Note | String | Fret | Left hand finger |
|---|---|---|---|
| F sharp | Second | Seventh | Fourth finger, little finger |
| D | Third | Seventh | Third finger, ring finger |
| A | Fourth | Seventh | Second finger, middle finger |
Play these notes individually, moving from the second string to the third and then the fourth.
The fingering is four, three, two, and the notes are F sharp, D, A.
Spend a little time practicing the move into this position. Aim to arrive comfortably and keep the notes even, without rushing the shift.
Finish with the Bass Figure
After those three notes, play the open third string, G, again.
Then use your third finger to play F sharp at the ninth fret of the fifth string. Follow that with the open fourth string, D.
Next, use your first finger to play E at the seventh fret of the fifth string, then return to F sharp at the ninth fret with your third finger.
This final group is:
F sharp, D, E, F sharp
Once that feels comfortable, connect it to the seventh fret notes and the open G.
Change the Ending on the Second Pass
The second time through, play the same passage until the last E.
At that point, pull off from E at the seventh fret of the fifth string to the open A string.
Pluck the E once, then let the left hand pull off sound the open A. Practice those two notes by themselves until both speak clearly.
Part 2: The Right Hand
The left hand gives us the notes, but the right hand requires just as much attention. A consistent picking pattern helps the passage feel connected and makes it easier to repeat.
The music uses the standard right hand letters:
| Letter | Finger |
|---|---|
| p | Thumb |
| i | Index |
| m | Middle |
| a | Ring |
Begin with Three Thumb Strokes
Use your thumb to play the sixth, fifth, and fourth strings:
p, p, p
Those are the opening notes, D, A, D.
After the third thumb stroke, the left hand performs the hammer on to E and the slide to F sharp. The right hand does not pluck those notes again.
Practice this small section first: three thumb strokes, followed by the hammer on and slide.
Add the Upper Strings
For the next three notes, use:
Index finger for the open G on the third string.
Middle finger for D on the second string.
Ring finger for the open E on the first string.
That gives you i, m, a.
The opening right hand pattern is therefore p, p, p, followed by the left hand hammer on and slide, then i, m, a.
Keep the movement relaxed and listen for an even sound as you move from the thumb to the fingers.
Return Through the Seventh Fret Notes
For the F sharp, D, and A at the seventh fret, use a, m, i:
Ring finger plays F sharp on the second string.
Middle finger plays D on the third string.
Index finger plays A on the fourth string.
Then use your middle finger to play the open G on the third string.
Bring the Thumb Back In
The thumb takes over for the final bass figure:
F sharp, D, E, F sharp
It moves from the fifth string to the open fourth string, then returns to the fifth string for E and F sharp.
On the second pass, your thumb plays the last E, and your left hand pulls off to the open A. There is no separate right hand stroke for that A.
Practicing the Complete Passage
Build the passage in small sections. Start with the three open bass notes, the hammer on, and the slide. Add the upper strings, then practice the move to the seventh fret. Finally, connect the bass ending and its second pass variation.
As you put everything together, listen for three things:
Clear notes: Give the hammer on, slide, and pull off enough attention that every note can be heard.
An even pulse: Keep the timing steady through the position changes.
A connected sound: Allow notes on different strings to overlap where possible.
Once the fingering feels comfortable, explore the musical shape of the passage. Let it build as it rises, then settle as it returns to the bass strings. Leave enough space for the open strings to ring.
That’s where this simple sequence begins to become a musical phrase, and a starting point for ideas of your own.